Showing posts with label Maya Road. Show all posts

Friday, August 27, 2010

Pink & Butterflies?

For boys?

When the theme is ICE CREAM I say YES!
My little take on the Crate Paper sketch challenge. I turned the sketch 90 degrees clockwise to fit the look I was going for.

Picking up Aven today from preschool I asked if the boy that had pushed and thrown rocks earlier in the week was being nice today. He said, "Mom , I told him...'Let's be more like Jesus'!"
Amen brother.

Enjoy your weekend :)

Thursday, August 26, 2010

Feeling Frisky?

Aven names every frog he finds "Frisky".

And we have no idea why!
You name your amphibians too, right? ;)

Friday, July 30, 2010

The last of Chicago

The last of the CHA pics.
A giant chicken. I am a little confused as to why:

Dear Lizzy decor, beautiful as always:

Some new Maya Mist:

Sheer doilies, so cute:

New THICKERS!!!!:


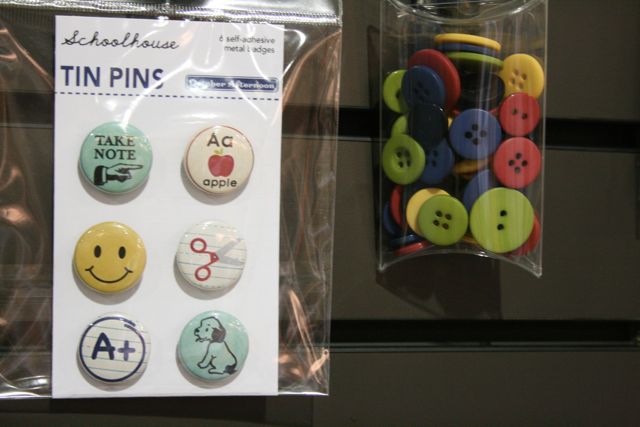
Of course I am digging the new October Afternoon tin pins and buttons to match:


Sassafras flowers:

The metal ones are my fav. Looks so much like vintage enamel pins:

There were FAB items at Jillibean Soup, Crate Paper and Studio Calico, along with a host of others, that I thought I took pics of but obviously forgot! :(

A few touristy pics too :)
Gotta have some Chicago pizza:

The L:

corn cob:

Navy Pier:

What are the new goodies you are most excited to play with from CHA?
I'm back home and waiting for my sweet boys. Excited to see them!
Have a wonderful weekend!

Thursday, July 1, 2010

Wanna Hula Hoop? and some fun news!

"Hula Hoop", Freehand Scraps July kit, went up for sale this morning and it is FAB! I believe all the design team girls are together on the fact it is a favorite. Definitely no "theme" to the kit, other than awesomeness (is that a word?) and new CHA goodies.

Aven heard the Blizzardmobile was going to be close so of course we had to swing by for a free oreo blizzard. I really wanted to cut ice cream cone shapes from my Slice, but didn't have that design card. I thought about purchasing an ice cream punch for 40% off....but then I saw these banner stickers and thought they made the perfect "cone".

Our church had a soldier salute in May, hence the "5.10" title, and the boys were beyond excited to see this helicopter there. I really liked using the more muted papers for this and the Girls' Paperie die cuts went along swell.

He only wants to be poolside. Just content as can be to sit along the side and observe. I wonder how long that will last..?! Used just the yellow tones of the Cosmo Cricket paper for the "suns" and the blue tones for the "waves". And might we all just be in shock here that I actually did some HAND WRITTEN journaling? yes, I gave the old typewriter a break ;)

Simple little card using Martha Stewart hydrangea punch over and over and over...

And this little job is quite random. But I like random ;) I had this piece of kraft paper leftover from cutting some Christmas tags and then used it as a scrap piece of paper to show a friend how to get the inked circles. Planned to just throw it away but then I saw some scraps from the kit and thought they could use a little home in those "negative" spaces that were left. A bit of sewing and SHOCK more hand written journaling and I called it good! Use those scraps!

As always be sure to check out the full gallery here and then click here to purchase your own!

In other news...I am THRILLED to be guesting on the October Afternoon blog for the month of July! Along with most every scrapper out there, they are a favorite company of mine and continue to release MUST HAVE lines. Be sure and stop by their blog throughout the month and check it today for a giveaway! :)

Tuesday, June 15, 2010

Silly me...


..how is it the middle of June and I am just now showing my "Parasol" projects?
In any case, this kit was lovely...subtle shades mixed with brights and the cutest little embellishments!
A simple little layout featuring a pic Aven took. Loved this transparency with the grey flocking. The middle papers are kinda patchworked together.

For Aven's preschool teachers end of the year gift we got them beach bags filled with a water bottle, sunscreen and beach towel. I made these little tags to hang on the bags and wrote a thank you on the reverse side.

And finally, a card. "Sew" fun putting this one together ;)

And there you have it! Check out this month's kit and the other beautiful gallery projects here.
Planning on a few mini getaways this summer...wouldn't a kit be the perfect thing to grab to take? No planning or matching products--it's already done for you! Grab some pics, scissors and glue and off you go. Sounds like a plan to me :)

Wednesday, May 26, 2010

The mini


Remember the mini album I sneaked a few posts ago? Here she is:

I love looking thru old treasures. I attribute that to my mom and mema, the queens of junking. I can remember my friend Katie and I dumpster diving for treasures when a thrift store on the square, St. Claire's Closet, went out of business and they threw what was left in a back alley dumpster. That was in middle school.


And the thrill of the hunt continues to this day.

I use to really be into more primitive-style antiques. But my taste is slowly becoming more modern, by about 100 years. ;) Mid century modern seems to be super popular and I must be jumping on that bandwagon because the style seems to really suit me at this point in my life.


I just thought how interesting it would be to take pictures around the house of the vintage look I am liking, because who knows...in 10, 20 years I might be into a whole different style.


This Maya Road canvas album is great--I tea stained all the pages and misted a few as well. The size was perfect for some instax pictures I took of my finds.

The paper and embellishments throughout are from The Girls' Paperie, mainly Paper Girl with some On Holiday thrown in for good measure. Both lines of alphas, buttons, brads, die cuts...just perfect.

If you have had a chance to play with these lines you know the vintage feel to them...totally went along with this album and treat to play with.

Looking forward to CHA Chicago this summer to see the new lines Margie will be debuting...and how the booth will be decorated. I kid you not, I could have lived in the booth from this past winter's show! SO CUTE!

So there you have it. A little tribute to my vintage style and findings! If you have any questions I will be happy to answer them :)
Have a beautiful day...I think we might be heading to the doctor. Paxton is sounding a bit croupy ;(
*Back from the doctor, and yep croup. And ANOTHER ear infection! Poor little dudey. Can't wait until June 7th for his ear tube surgery. Praying that will help do the trick.


Monday, May 17, 2010

How could something so good...

...be so wrong? I have passed by this unassuming jar in the store on several occasions and just last week decided I needed to give it a try.
I should have just walked on by.
It is sin in a jar I tell you.
Wonderful, hazelnutty, chocolate loving sin.
Does anyone have any recipes using this stuff, because as you can see the recipe of the moment is sticking a spoon in the jar and lapping it up.
*NOTE: I didn't even take the time to put away the groceries in the background before digging in.
Sinful.

And in unrelated news a sneak of a layout you can see in full here:

This warmer weather is bringing out some great thrifting finds! I will share later this week :)

Tuesday, April 6, 2010

Oh April...

...you are off to a great start.
what with your sunshining days, your Easter blessings, your thrift store findings and "Brilliant" kit making:


The Freehand Scraps April kit "Brilliant" is up for sale and it is just perfect for this time of year! Be sure to check out the gallery for more inspiration. As always, if you have any questions about what I did just ask :)
And in case you are curious the thrifty findings over the weekend were great. $7.50 for a retro chair?! Rory was not a fan...sure it needs recovering, but again I say SEVEN DOLLARS AND FIFTY CENTS!!! Plus a woodgrain thermos, a cool $1 sheet and $1 deer cross stitch picture. A pretty cheap thrill if you ask me ;)

Friday, January 15, 2010

'Tis NOT the season, but oh well!

So.

I had this idea before Christmas, but it has just now came to fruition.
And I

love

it!!

You could think of it 2 ways: either I am sadly waaaaay behind in making this..

or how I like to think of it..

..super early in decorating/crafting for Christmas 2010 ;)

So would you like to see more? You're here...might as well :) Be forewarned...LOTS of pictures and perhaps boring if your not into the crafty thing.

It reminds me of something you might see in Anthro for the holiday season, but on a much smaller, and cheaper scale!

So here's what I did:

I ordered some paper mache bells online. I actually ordered a dozen, but the little boogers took longer than I thought so I only ended up making 6...for now...I mean..I have SEVERAL months to make the rest and STILL be on time, right? ;) Cut the bottoms off because I wanted to add the little "jingle" to the bells in the form of vintage buttons and a couple of vintage mini bells. I loved the way the newsprint showed thru, but the ones that had funky colored print I misted with Maya Road emerald metallic mist. It's hard for me to do any project without misting..and sewing. Even bells.

The easiest part of the project was using this little puppy--my new trimmer (Purple Cows Ultimate Trimmer II to be exact.). I had always wanted a guillotine type trimmer, but I didn't want it to be too bulky for crops. Not only does this fold compact into it's own case, it comes with a freestyle cutter--perfect for making my hills any curve I wanted. (Hills you ask?Wait for it...)

There are a few click blades you can interchange. I liked the short wave blade and used it for interest on some of my hills edge.


Just a few cuts and my paper was ready to go. SO NICE to be able to cut several sheets at once. I actually got a little carried away and cut about 3 times as much as I needed--whoopsie!

The line I used for this project was Joy Ride by Collage Press. Love that line. Has the vintage/kitchy look I love and I loved the robin egg blue and pink thrown in for Chirtmas colors.
The hardest part was paper maching.....paper mache ;) Took my piles of strips and overlapped with with sparkle mod podge. The easiest way to do this is to start from the top and go down, then wrap around horizontally. I didn't want it to neccessarily lay flat...I liked the funky way the layers of paper stood out.

And then the glitter. OH MY. This new vintage leaf glitter from Martha Stewart (who else, right?) had the perfect texture and colors for the look I was after. I used a different color on each bell.


Once those beauties are dry use some vintage buttons and bakers twine to make the little jingley part. Hard to see once they are hanging how fun some of the buttons are. In retrospect I might have made them hang lower.

Wanted the bells to look like they went togther, but I created each one independently so they had unique looks...their own personality if you will :)
Now I think these would look just dandy like this, but we gotta embellish right? Right!

Dug into my stash of vintage Christmas goodies and scrapbooking bits.

Each one a bit different. Those leaves were actually silver, used Maya Road carnation mist on them for a pink shine to match the glittered bottom.

Typed "Let it snow" on some vintage paper here.

Used a piece of vintage christmas hymnal along with a gummed back old reindeer I have been saving FOREVER!

vintage buttons for some "jingle"

(Is it possible to use the word "vintage" any more times in one blog entry?!!)
The vintage bells inside the bell as I mentioned earlier...


I've had this tree from Wal Mart I got on clearance several years ago and have never used it. I really liked the way they looked all hanging together....but maybe....

I should do a little something more.

Like spray paint a tree branch white.

Or silver.


Or maybe I should wrap it in yarn.

Yes. Take the next month of your life and wrap a branch in yarn! Just kidding. It didn't take that long. You can catch up with some tivo-ed shows to pass the time. I love this because I know I can reuse it for other holidays...I'm thinking I'll hang some valentine doilies from it next and then I aready have spring ideas in my head. So although it might take a few nights, it's versatile!
But the branch has to go in something. How about an altered oatmeal container?


I sprayed the whole thing with, yep, Maya Road silver plated mist. It has a sparkly sheen in real life. Some stickles added to the chipboard pieces. Used Martha Stewart (again with the Martha!!) clear microbeads for the frost on the ski hill.

Doesn't she look like she's having fun?

Doilies on the top, punched into snowflakes and sewn on and also added to cover the sand. Yep, stand your branch in sand...mine happened to be wet sand but it worked great! I had one little place on the branch that didn't look quite right so I made this to cover it up. Perfectly imperfect!


Some chipboard snowflakes put on randomly and a bit of pom-pom for decoration. Really, I think this looks fun just like it is, but we worked too hard on those bells! Time to decorate--my favorite part ;)
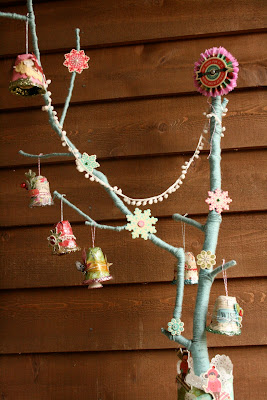


The most difficult thing was trying to get the bells all hanging in the right direction without turning for a picture. For some reason they have a mind of their own ;) But I think you get the idea. I would love to know what my neighbor thought of me hauling this out onto our front entry and decorating for Christmas in January! Actually, she probably wouldn't think much of it by now ;)

So...what do YOU think? Whimsical? Fun? Crazy? If you have any questions PLEASE leave them in the comment section and I will try and answer them!

Now the sad part, off to dissemble ;(